Thu, December 3, 2009
These balls are made for walkin'—2:07 PM
Countless hours (actual count: probably four) were spent taking the "vanilla walk" from blocking to final animation, with exacting attention paid to the arc of the ankle, the "pop" of the knee, and the rotation of the foot. It's all in service of making the walk look as normal as possible: tricking the brain into believing that the graphic approximation on the screen is really a character walking. Among the harder things to do, since we all see people walking all the time. Thus, your eye tends to pick out any little glitch if an animator has missed his mark. It's amazing how much difference it makes if you move the toe a little bit higher for one frame, or move the ankle forward or back a frame faster or slower. This is a 48-frame assignment, which (if you don't already know), means 2 seconds. Because it's a vanilla walk, it's all supposed to be very straight and symmetrical, which means it's highly mathematical. Animate one leg for 12 frames, mirror everything to the other leg on the opposite cycle to get to 24 frames, then repeat to get to 48. So basically you are animating one half second of movement, and it takes two weeks to get it right. That's how intricate it is! How fortunate that I like intricate things.
Luckily we have another walk to work on this week and next, because I feel like I had to rush through parts of this one just to make the deadline. The second walk will be a "personality walk," in contrast to the bland conformity of the vanilla walk.
A classmate had the bright idea to color the far leg darker (the left leg, in this case), so that it would be more visually distinct while the character is walking. I'm not sure exactly how he went about this. It's not trivial to select the parts of the leg and change their color, because once a character is "rigged," its individual parts are kind of hard to access. Instead of clicking on his feet and legs to move them, the animator (me) clicks on his "controllers."
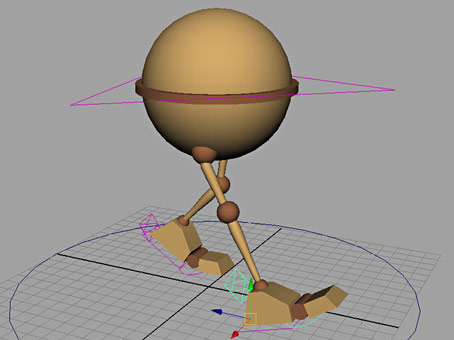
Ballie, with his controls visible.
(For a little more depth on how this works, see some more pictures of the Ballie rig.)
In a normal production workflow, this is a good thing, because animators don't need to worry about the character's geometry or its colors or textures, or even the camera placement in most cases. Someone in another department is taking care of all of that stuff – the animator just handles the performance. Having everything else locked means no costly mistakes where something might accidentally get deleted or broken. But right now we are all generalists, lording over every domain, so if that color is going to change, it'll be us who changes it.
Technically, you could use the Hypergraph or Outliner to locate the individual pieces of geometry corresponding to the left leg, select them, and assign them all new textures with adjusted colors. I found it far simpler to just add a little "scrim" to the scene.
In live action, you'd never get away with this, because it has to bisect the character, and you'd catch hell from the actor's union rep about that, but in the virtual world, anything is possible. I created a plane, gave it a black texture, dialed its opacity way, way down, and put it right through the middle of Ballie.
Voila! Right leg clear; left leg dark. No need to hunt down individual pieces of geometry; no need to create separate "darker" versions of the knee color and the foot color. Just click and go.


LilSis — Thu, 12/3/09 5:04pm
Genius! Love the solution to the darker leg problem.